Office 365 uses the cloud-based user identity management service Azure Active Directory to manage users. You can also integrate your on-premises Active Directory with Azure AD by synchronizing your on-premises environment with Office 365. Once you set up synchronization you can decide to have their user authentication take place within Azure AD or within your on-premises directory.
Office 365 Directory synchronization
You can either use synchronized identity or federated identity between your on-premises organization and Office 365. With synchronized identity, you manage your users on-premises, and they are authenticated by Azure AD when they use the same password in the cloud as on-premises. This is the most common directory synchronization scenario. Federated identity, also known as single sign-on (SSO), allows you to manage your users on-premises and they are authenticated by your on-premises directory. Federated identity requires additional configuration and enables your users to only sign in once. For details, read Understanding Office 365 Identity and Azure Active Directory.
Want to upgrade from Windows Azure Active Directory sync (DirSync) to Azure Active Directory Connect?
If you are currently using DirSync and want to upgrade, head over to azure.com for upgrade instructions.
Prerequisites for Azure AD Connect
You get a free subscription to Azure AD with your Office 365 subscription. When you set up directory synchronization, you will install Azure Active Directory Connect on one of your on-premises servers.
For Office 365 you will need to:
- Verify your on-premises domain (the procedure will guide you through this).
- Have Global Administrator permissions for your Office 365 tenant and on-premises Active Directory.
For your on-premises server on which you install Azure AD Connect you will need the following software:
| Server OS | Other software |
| Windows Server 2012 R2 | PowerShell is installed by default, no action is required.
Net 4.5.1 and later releases are offered through Windows Update. Make sure you have installed the latest updates to Windows Server in the Control Panel. |
| Windows Server 2008 R2 with Service Pack 1 (SP1) or Windows Server 2012 | The latest version of PowerShell is available in Windows Management Framework 4.0. Search for it on Microsoft Download Center.
.Net 4.5.1 and later releases are available on Microsoft Download Center. |
| Windows Server 2008 | The latest supported version of PowerShell is available in Windows Management Framework 3.0, available on Microsoft Download Center.
.Net 4.5.1 and later releases are available on Microsoft Download Center. |
Note: If you’re using Azure Active Directory DirSync, the maximum number of distribution group members that you can synchronize from your on-premises Active Directory to Azure Active Directory is 15,000. For Azure AD Connect, that number is 50,000.
To more carefully review hardware, software, account and permissions requirements, SSL certificate requirements, and object limits for Azure AD Connect, read Prerequisites for Azure Active Directory Connect.
You can also review the Azure AD Connect version release history to see what is included and fixed in each release.
To set up directory synchronization
- Sign in to the Office 365 admin center and choose Users > Active Users on the left navigation.
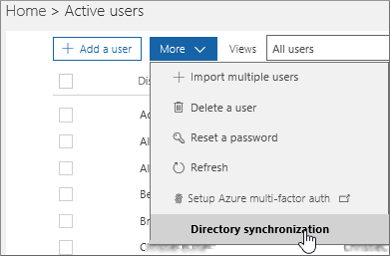
- In the Office 365 admin center, on the Active users page, choose More > Directory synchronization.
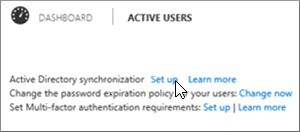
 In the old Office 365 admin center, on the ACTIVE USERS page, choose Set up next to Active Directory synchronization.
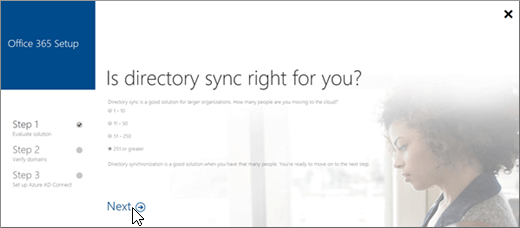
- On the Is directory sync right for you? page, the two first choices of 1-10, and 11-50 result in “Based on the size of your organization, we recommend that you create and manage users in the cloud. Using directory synchronization will make your setup more complex. Go to Active users to add your users.”You can still, however, continue setting up directory synchronization by choosing Continue here on the bottom of the page.
If you select the two latter choices, 51-250 or 251 or greater, the synchronization setup will recommend directory synchronization. Choose Next to continue.
- On the Sync your local directory with the cloud, read the information, and if you want more information, choose the learn more link that goes to: Prepare to provision users through directory synchronization to Office 365, and then choose Next .
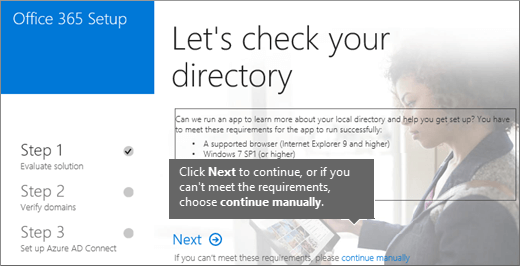
- On the Let’s check your directory page, review the requirements for automatically checking your directory. If you meet the requirements, choose Next > Start scan. If you can’t meet the requirements you can still continue by choosing continue manually.
- If you select to scan your directories, choose Start scan on the Evaluating directory synchronization setup page.Follow the instructions to download and run the scan.
- Once the scan is complete, return to the setup wizard, and choose Next to see your scan results.
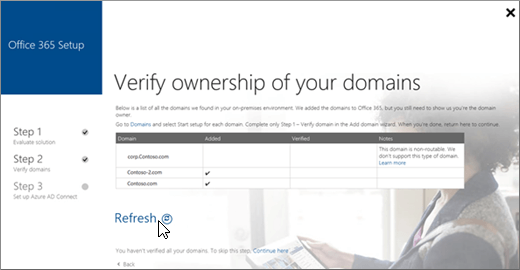
- Verify your domains as instructed on the Verify Ownership of your domains page. For detailed instructions, see Create DNS records for Office 365 when you manage your DNS records.
Important: After you have added a TXT record to verify you own your domain, do not go to the next step of adding users in the domains wizard. The directory synchronization will add users for you.
Return to the Office 365 Setup page and choose Refresh
- On the Your domains are ready page, choose Next.
- On the Clean up your environment page, optionally follow the instructions to download IDFix to check your Active Directory. Choose Next to continue.
- On the Run Azure Active Directory Connect page, choose Download to install Azure AD Connect wizard.
Note: At this point you will be in the Azure AD Connect wizard. Make sure you leave the directory synchronization wizard page you were last on open in your browser, so you can return to it after the Azure AD Connect steps are done.
After Azure AD Connect wizard has installed it will automatically open. You can also open it from your desktop, the default install site. Follow the wizard instructions depending on your scenario:
- For directory synchronization with password synchronization, use Azure AD Connect with express settings.
- For multiple forests and SSO options, use Custom Installation of Azure AD Connect.Select Customize on the Express Settings page to use these options.
- After the Azure AD Connect wizard is done, return to the Office 365 Setup wizard, and follow the instructions on the Make sure sync worked as expected page. Choose Next to continue.
- Read the instructions on the Activate users page and then choose Next.
- Choose Finish on the You’re all setup page.
Assign licences to synchronized users
- After you have synchronized your users to Office 365, they are created but you need to assign licenses to them so they can use Office 365 features, such as mail. For instructions, see Assign licenses to users in Office 365 for business.
Finish setting up domains
- Follow the steps in Create DNS records for Office 365 when you manage your DNS records to finish setting up your domains.
 New to Office 365? New to Office 365?Discover free video courses for Office 365 admins and IT pros, brought to you by LinkedIn Learning. |